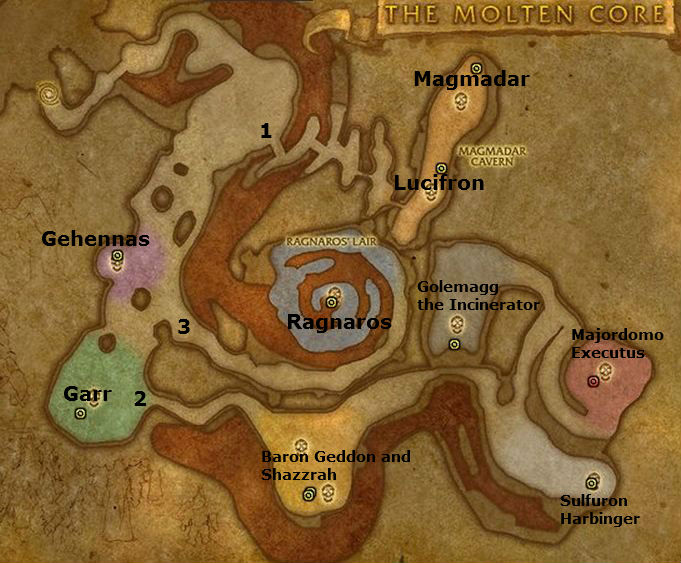
 Molten Core, the first true step along the path to raiding in world of warcraft. Home to a large variety of fiery monsters such as the molten giant or the lava imp, it is quite a dangerous place for newcomers.
From the World of Warcraft Site:
The Molten Core lies at the very bottom of Blackrock Depths. It is the heart of Blackrock Mountain and the exact spot where, long ago in a desperate bid to turn the tide of the dwarven civil war, Sorcerer-thane Thaurissan summoned the elemental Firelord, Ragnaros, into the world. Though the Firelord is incapable of straying far from the blazing core, it is believed that his elemental minions command the Dark Iron dwarves, who are in the midst of creating armies out of living stone.
The burning lake where Ragnaros lies sleeping acts as a rift connecting to the elemental plane of fire, allowing the malicious elementals to pass through. Chief among Ragnaros’ agents is Majordomo Executus – for this cunning humanoid is the only one capable of calling the Firelord from his slumber.
Originally
Before attempting to venture further then half-way into the dungeon your raid would be required to have a large amount of fire resistance gear, unprepared guilds would perish.
The fire lord, Ragnaros, has been known to stagnate the progression of many a guild that does not have the proper gear nor the coordination to face him.
In Mists of Pandaria
The entire dungeon can easily be soloed by just about any level 90 in M of P level gear. Hit 90, get your item level 450 Contender’s set (or comparable PvE gear,) and go clean the place out. 85s in good gear will have to work a bit, but combat machine’s should be Ok.
It will be a quite a challenge for a full raid group of level 60s, even those in heirlooms and appropriate gear.
Getting into the place
You do need to be “attuned” to this instance, even in M of P, though you don’t need to be part of any group. You can do the attunement quest and clean out the dungeon all by yourself.
Blackrock Mountain is a zone between the Burning Steppes and the Searing Gorge, linking the two regions. Head into the mountain through the giant doors, go to the central area, decend to the very bottom of the central structure and talk to the Blood Elf, Lothos Riftwaker. He’ll send you on the easy quest.
This video will give you the walk-through. It starts at about 40 seconds in and will take you through finding the place, getting attuned, and then getting in.
Once you’re “attuned” all you have to do is talk to Lothos and he’ll teleport you to the instance.
One you’re in:
- If you’re a caster watch out for silences and spell locks. Fighting several Firelords at one will be frustrating due to chained 16 second blanket silences. One at a time is easy.
- Other than that there are a few knockbacks and stuns, but nothing for a level 90 to worry about.
- Lava isn’t what it used to be. This stuff won’t bother you so swim through it if you feel the urge.
- Area effect spells and area effect melee abilities will be quite useful.
- Your PvP trinket (escape from effects) will have some use, especially against those silences.
Best way to die:
Just in case you want a faster way out of the instance without hearthing.
- Collect a bunch of any mobs, take off all your gear, and wait awhile. Eventually they’ll finish you off. Taking off the gear makes it faster and saves on repair costs.
Some Notes About The Molten Core
You have to kill all the other bosses, except Ragnaros, before Majordomo Executus will appear.
You have to kill all the bosses before Ragnaros will appear.
- Start at #1, clean out the two bosses. The core hounds will attack in groups and all the hounds in each group must be killed at the same time, or close to it, or they’ll keep rezzing. Effective area attacks are the key here. The Mage’s Blizzard spell works very well here.
- Next go to tunnel #2. hit the Majordomo last, otherwise he won’t appear. When fighting this fellow ignore him completely and destroy his adds. You can’t hurt him, but he’ll quit the fight when they are all down. He keep teleporting you to the hot rocks in the center of the area. They don’t hurt, but you’ll have to reaquire the adds.
- Lastly go through #3, to the big fiery thing himself. Talk to the secretary dude. He’ll chat awhile then summon the big guy. Rag will chat with his secretary first, then kill him. After that happens you can finish him off and you’re done.
Why Do Molten Core When You’re 90?
For the loots, the achievements, and just to see one of the original raids. There are also some crafting materials to be found here, if you’re into crafting rare stuff. In addition, some of the gear found here looks pretty cool and you might wish to use it for Transmogrification.
You’ll find some loot that can be sold on the auction house, including blue and purple gear. Bring empty bags, you’ll fill ’em up, then sell stuff on the AH. Chances are you’ll make a nice bit of gold for an hour’s work.
The Bosses of the Molten Core
- MT – Main Tank
- AE or AoE =Area Effect
- DoT – Damage over Time
- FR =Fire Resistance
More or less in order of encounter:
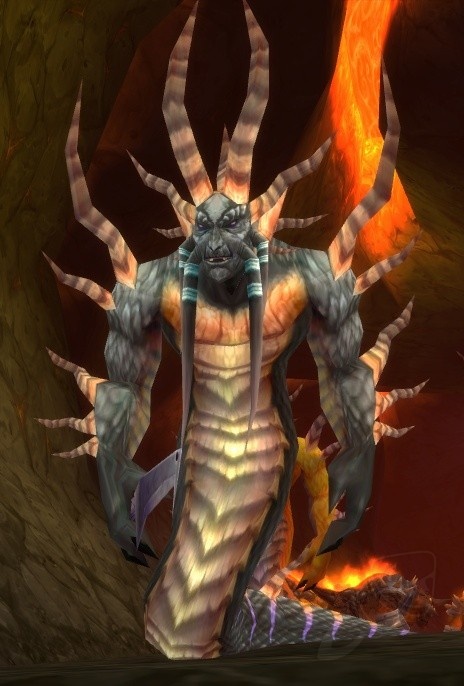 Lucifron
Easy to beat first boss of molten core, this should be a breeze if you’re prepared at all.
Abilities:
- Impending Doom: Deals 2000 shadow damage to the afflicted target after 10 seconds, this is AoE cast onto your raid.
- Lucifron’s Curse: Increases cost of spells and abilities by 100% for 5 mins. This should be dispelled as fast as possible.
- Dominate: Cast by Lucifron’s guards. Make sure to purge this as fast as possible.
The Fight (If you’re teaming at a lower level)
After clearing the core hounds, pull Lucifron into the corner a small ways away from the raid and kill both the guards. First focus firing them down one at a time before working on Lucifron. Make sure that all healers get Lucifron’s curse dispelled off of them else you will run out of mana.
Once both guards are down Lucifron is a breeze, keep the dispelling and curse removals up and you’ll win.
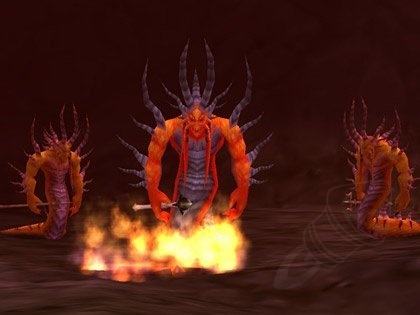
Magmadar

The biggest and baddest of the Core Hounds in the Molten Core. Kill this guy off and the ancient Core Hounds will no longer respawn in the raid. As if you care much.
Since he’s a beast you Hunter types might take a shot a taming him for your collection.
Abilities
Fire Cone: Magmadar periodically breathes a fire cone of area of effect damage in front of him. This should only hit the main tank if you are positioned correctly.
AoE Fear: Every 30 seconds Magmadar emits an Area of Effect fear spell. This can be countered by Warriors changing stances or by fear ward, or tremor totem.
Magma Spit: Magmadar will randomly spit out lava during the fight. If he spits one at you move out quickly to avoid DoT effects. If you stand in the fire long enough then when you move you will ignite nearby members of your raid.
Frenzy: Magmadar will grow in size and turn red when this ability goes off. This effect increases Magmadar’s attack speed by 150% and is countered by Tranquilizing Shot. Tranquilizing shot is a hunter ability, the item required to learn the ability drops every time you kill Lucifron.
Immolate: Anyone in melee range of Magmadar will experience minor damage from an immolation aura.
Gehennas
Pretty easy boss for most guilds, just need some good positioning and experience to pull it off.
Abilities
The adds for this fight have a cleave ability that stun whoever they hit but it isn’t a big deal.
Gehennas’s Curse: Gehennas casts this every 30 seconds and reduces healing by 75%. Make sure you cure this on the MT as fast as possible.
Shadow Bolt: Gehennas shadow bolts quite a bit and they can do over 2000 damage. He randomly targets someone to cast this so have healers ready to heal whoever gets hit.
Rain of Fire: Gehennas casts a AE rain of fire spell like the warlocks spell but his version does quite a bit of damage and anyone hit by this should run out as fast as possible.
Garr
Easy boss disguised by the number of adds he has. This fight is all about execution and skill so make sure you have good pullers and a couple warlocks at least.
Abilities
Anti-Magic Aura: Every couple seconds garr has a pulse that removes buffs
Magma Shackles: This is also part of garrs aura, snares everyone to 40% movement speed
Detonation: Garr will randomly detonate his minions causing them to explode and deal a bit of damage
Baron Geddon
Originally this was a fight that required high Fire resistance, but you won’t have a problem.
Abilities
Inferno: Baron G. will stop moving or attacking and cast a AoE fire spell and maintain it for about 8 seconds.
Ignite Mana: This is a manaburn DoT that removes mana and deals damage each tick.
Living Bomb: Baron will cast this on random people. If you’re in a lower level team you should move away until it’s dispelled or blows up.
The Fight
Originally most guilds would pull Baron Geddon back into Garr’s room, this allows you to have a good fight center. Your raid should be positioned in a line a little ways away from the back wall. Geddon will be pulled into the center of the room.
The reason for the line formation is that whenever someone gets the bomb they will run back into the back wall and explode there. This allows you to easily avoid wiping from the bomb. Your melee DPS will run in whenever Geddon isn’t doing his AoE, if he starts have everyone move out except in some cases the MT. Geddon will eventually hit the MT with the bomb Debuff so be ready.
Shazzrah
Abilities
Deaden Magic: Reduces the magic dealt to shazzrah down to almost nothing. Purge/dispell this.
Blink: Shazzrah will blink into a random raid group every 45 or so seconds. Whoever he targets needs to run towards the MT.
Arcane Explosion: Deals damage in a large area of effect.
Shazzrah’s Curse: Increases magic damage dealt to players, can be dispelled.
AoE Counterspell: Silences a group of people
Fight
Shazzrah will cast his magic damage reducer quite a bit so be ready to get rid of it lest you waste alot of damage. If shazzrah blinks and isn’t run back to the MT quickly he can destroy parts of your raid with his AoE.
Your MT should have no problem by now with tanking Shazzrah, he dosen’t really do much damage and only his blink should mess you up at all.
If your raid is prepared to deal with the silences/blinks this is a breeze.
Sulfuron
 This can be a rather hard fight, many times the guards can wipe players.
Abilities
Heal: Sulfuron’s guards will heal eachother if they are not pulled a ways away from each other.
Shadow Word: Pain: Sulfuron’s guards can cast SW:Pain on players, this does a very high amount of damage when it ticks and should be dispelled as soon as possible.
Immolate: Sulfuron’s guards can cast immolate on players dealing 400 damage every 3 seconds, dispell this.
The Fight
Your first objective is to focus fire the guards, they are pretty deadly so take them down one at a time first. Have your dispellers ready to get rid of SW:Pain if it pops up on someone, it can easily kill your healers/tanks.
Once the guards are down just beat on the boss, he dosen’t do much by himself so once the guards are gone it’s a rather easy fight. This boss is known to drop the infamous “Vendorstrike” AKA Shadowstrike.
Good luck.
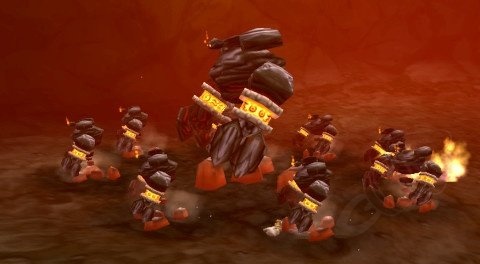
Golemagg
 This is one tough giant, he knows how to stomp everyone.
Abilities
Earthquake: When Golemagg hits 10% HP he will start hitting everyone around him with earthquakes dealing quite a bit of damage.
Pyroblast: Golemagg will randomly shoot out large fireballs with an added 300 damage DoT.
Core Rager
Thrash: Double attack
Mangle: deals 80 damage
Fight
Golemagg hits hard, and the beating on your tank just gets harder as the fight goes on. Once golemagg is under 20% your healer’s will be hard pressed to keep your tank up, also your DPS needs a group of healers to keep them alive.
The adds are invulnerable and only die when golemagg goes down, keep a good off-tank and a healer or 2 on each of them. The good thing is this is a straight up melee fight so if you have enough DPS your good.
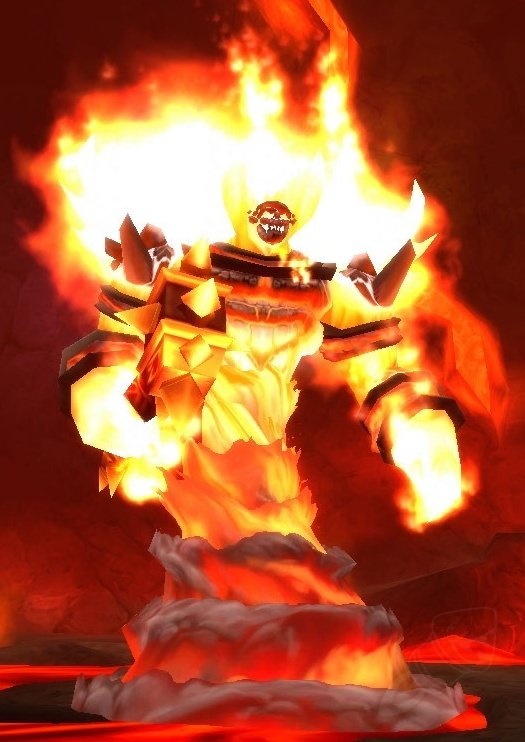
MajorDomo Executus
 Rather hard boss, Executus used to block quite a few people, preventing them from progressing any farther for quite a while.
Abilities
Teleport: Major Domo will randomly teleport one player into the center of the fire pit. This used to cause major issue to the raid, but at 90 you won’t care much. Just make sure to re-target on of the guards, not Majordomo.
Fire Blast: This deals a moderate amount of AoE Fire damage.
Magic Reflection: This shield has a 50% chance of reflecting spells back on the caster. This lasts 10 seconds.
Flamewalker Healer Abilities
Damage Shield: This shield reflects melee damage back upon the attacker, this lasts 10 seconds.
Shadowbolt: Deals around 1300-1600 damage, randomly targeted.
Heal: This can be cast on any of the flamewalkers healing them quite a bit.
Flamewalker Elite Abilities
Fire Blast: This deals a moderate amount of AoE Fire damage.
Magic Reflection: This shield has a 50% chance of reflecting spells back on the caster. This lasts 10 seconds.
Damage Shield: This shield reflects melee damage back upon the attacker, this lasts 10 seconds.
Positioning:
When you go into this pull you will need at least 4 mages, they will be in charge of sheeping the flamewalker healers. Your raid will break up into small groups a couple of healer’s per off-tank and your DPS will be in one clump.
You will need quite a few tanks and thus some guilds use druids if needed or as back-up tanks. You will need a lot of mana for this fight as it can go on for a while, endurance is key.
Fight:
When this fight starts you will need 4 off-tanks to get the flamewalker elites, Major Domo can’t be killed so off-tank him the entire fight. Your strategy for this fight is the following:
1.-Send in Tanks
2.-Sheep 3 Healers
3.-Kill Un-sheeped Healer
4.-Kill one Elite
5.-One by one un-sheep and kill the healer’s
6.-Kill the rest of the elites
Set up a tank or 2 on major domo, 4 tanks for the flamewalker elites and 1 for the killing the healers. Give each off-tank/MT 1-3 healer’s each depending on how hard he’s getting hit. Have your DPS group up and follow your main targeter to each target.
Your main-assist/targeter has to be experienced in this, if he chooses the wrong order of targets you can wipe. Also if you see any healer’s running around un-sheeped take them out.
The one tricky thing to this fight is the shields major domo casts on his minions. They switch between magic and damage reflection. Be careful not to try and sheep the magic reflected ones as this backfires sheeping your mage.
Each time the shield goes up have either melee or casters pull out depending on the type of shield. Once all the flamewalkers are dead major domo gives up and leaves his chest of loot, good luck.
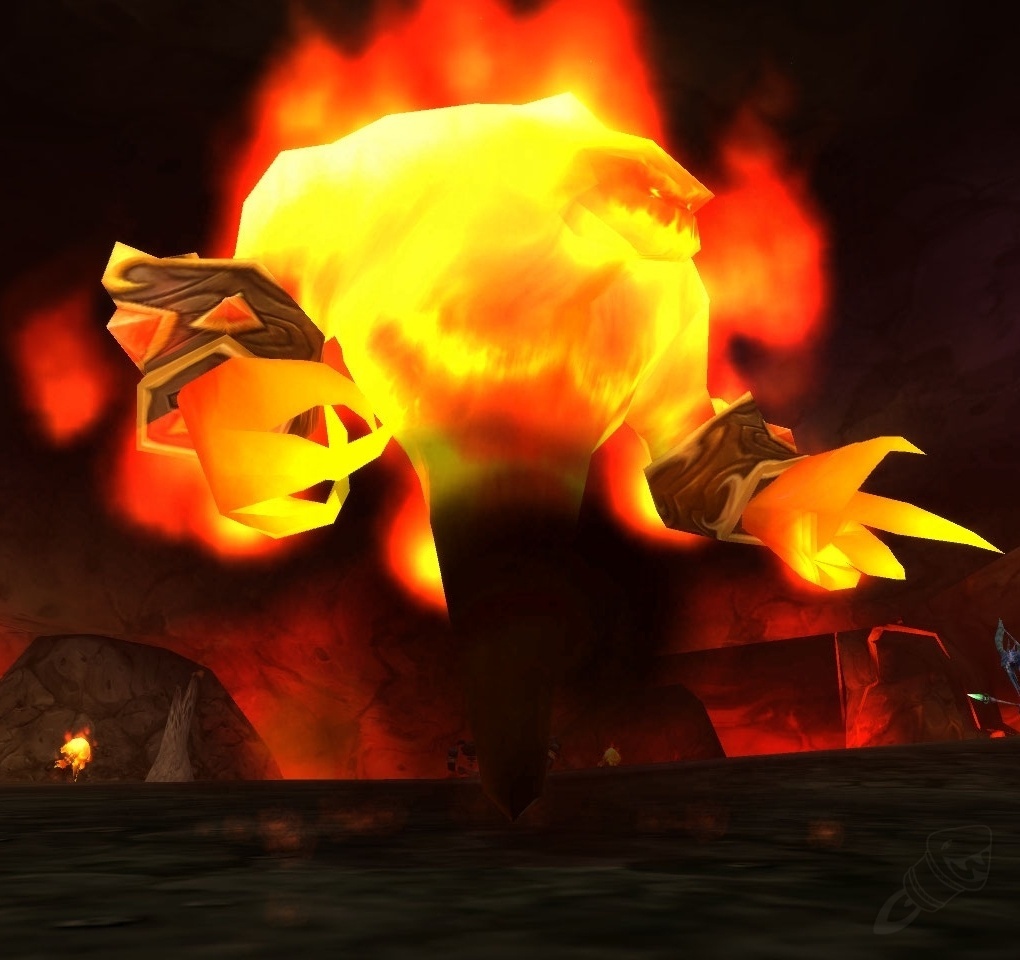
Ragnaros
 His Burning Awfulness in all His Flaming Glory
Ragnaros Abilities
Wrath of Ragnaros: Melee range fire attack that attempts to knock multiple targets back and into the air.
Fireball: Randomly shoots a fireball at someone that knocks him and players near him back.
Fire DoT: The player who Ragnaros is attacking will get hit by a fire DoT.
Melt Weapon: Every time anyone hits ragnaros they suffer durability damage.
Lava Splash: The inner circle of lava around ragnaros will erupt causing damage to anyone nearby.
Magma Blast: If nobody is within melee range of Ragnaros he will randomly blast people for 6000 damage.
Sons of Flame:
These will appear 3 minutes into the fight while ragnaros submerges making him immune. 8 sons will spawn – they have an AoE aura that drains mana so keep them away from mana classes.
Chances are that Rag. will not last the three minutes to your level 90 awesomeness.